March 30, 2011

Colourful Cookies

Cookbook Adventure #7 - "Cakes and Cookies"

Yes another repeat cookbook! But this time at the request of my eldest child who wanted to take these cookies to school for birthday treats for the whole class. 


They were so popular that we did another batch for my second child's birthday treats for her class too!

A great way to occupy the kids for an afternoon and to let their creative talents loose.


Here's the very easy Thermotalk version of the recipe:

Ingredients
200g butter, roughly cut into 1-2cm cubes
200g raw sugar
2 eggs
450g plain flour
approximately 200g icing sugar for icing

Method
Preheat oven to 180C.
If you don't already have icing sugar, place 200g white sugar in TM bowl and mill to icing sugar for 15 seconds on speed 9. Set aside.
Place raw sugar into TM bowl. Mill to caster sugar for 3 seconds on speed 9.
Add butter to the TM bowl. Cream for about 3 minutes on speed 4 until pale and creamy. You may have to scrape down the sides of the bowl occasionally.
Add eggs one at a time with the Thermomix running on speed 4, until combined.
Add plain flour. Knead for 1 minute on interval speed or until dough comes together.
Remove the dough, wrap in plastic or your Thermomat, and refrigerate for 15 minutes.
Roll the dough out on a floured surface until 5mm thick and cut out your cookies. Place on a greased baking tray or one lined with greaseproof paper and bake for 10 minutes or until golden brown.
Cool on wire racks.
Golden brown and great with a cuppa!
To make a water icing: add enough water to the icing sugar to make a thick smooth paste and add food colouring if desired.

Make yourself a cup of tea or coffee and enjoy one (or two) of the cookies  whilst the kids go wild with the decorating!

Batch #1

Batch #2
Serving size tips: This recipe makes approximately 40 medium sized cookies and countless small cookies.  The recipe can be halved (we used half the recipe for batch #2 and still ended up with 80 mini cookies!)

March 22, 2011

Cashew, Almond & Maple Syrup Granola

The name says it all! A very yummy (semi-healthy) breakfast cereal and snack. 

The original recipe is from that American guru of food science - Alton Brown, but I have modified his method to speed up the process, and of course have also used the Thermomix!

Here it is in Thermotalk:

Ingredients
150g cashews 
150g slivered almonds
300g rolled oats
100g sunflower seeds (optional)
50g shredded coconut
40g brown sugar

50g vegetable oil
80g maple syrup
3/4 tsp salt
100g raisins (optional)

Method
Preheat oven to 220°C. 
Place cashews in TM bowl and chop for 2 seconds on speed 5. (You can leave them whole but I prefer them to be closer in size to the rest of the ingredients.)  
Before baking
Nicely toasted
Place cashews, almonds, rolled oats and sunflower seeds (if using) onto a half-sheet (45x33cm) pan / baking tray. Bake for 3 minutes - stir mixture - bake for 3 more minutes. The oats won’t brown, but they should begin to smell toasty. Don’t overbake, or the oats and nuts will begin to burn. 
Remove the pan from the oven. (Keep the oven on). Sprinkle the coconut evenly over the top.
While the oat/nut mixture is toasting, place the brown sugar, vegetable oil, maple syrup and salt into the TM bowl. Cook at Varoma temperature on speed 3 for 2 minutes or until the sugar has melted.
Pour it as evenly as possible over the oats/nut mixture and mix thoroughly to combine. 
(You can do this in a separate bowl, but I try not to use too many bowls (less washing up!) and you shouldn't get too much spillage if you mix it carefully on the large pan (I use a large serving spoon to "fold" the ingredients together rather than "stir").
Return the pan to the oven for 3 minutes - stir mixture - bake for another 3 more minutes.
Allow to cool and store in an airtight container.

It's fantastic over natural yoghurt and fresh fruit in season!

March 15, 2011

Pappardelle with amazing slow cooked meat

Jamie's KitchenCookbook Adventure #6 - "jamie's kitchen"

Yes I know, only six Cookbook Adventures so far and already I have turned to Jamie again!

Jamie Oliver's Pappardelle with Amazing Slow-Cooked Meat Recipe
I had some gravy beef that needed to be used up and I have just got into making my own pasta, so this recipe was a perfect combination.  
The full recipe for the meat is reproduced on Leites Culinaria's websiteThe recipe for the pasta is on Jamie's website.


And here is my Thermotalk version:
PAPPARDELLE
Ingredients
3 eggs
300g plain flour

Method

1. Place all ingredients in TM bowl. Set dial to closed lid position and knead for 2 minutes on Interval speed. 
2. Remove from TM bowl and wrap in plastic wrap. Set aside to rest for 30 minutes. 
3. Once rested follow Jamie's instructions on how to roll out the pasta.
4. When the pasta is rolled out, dust it well with flour then fold in half, fold in half again, and then once more, dusting with flour each time. 
5. For pappardelle cut the flat rolls into 2cm sections. 


6. Make a cage with your fingers and shake until the pasta separates.

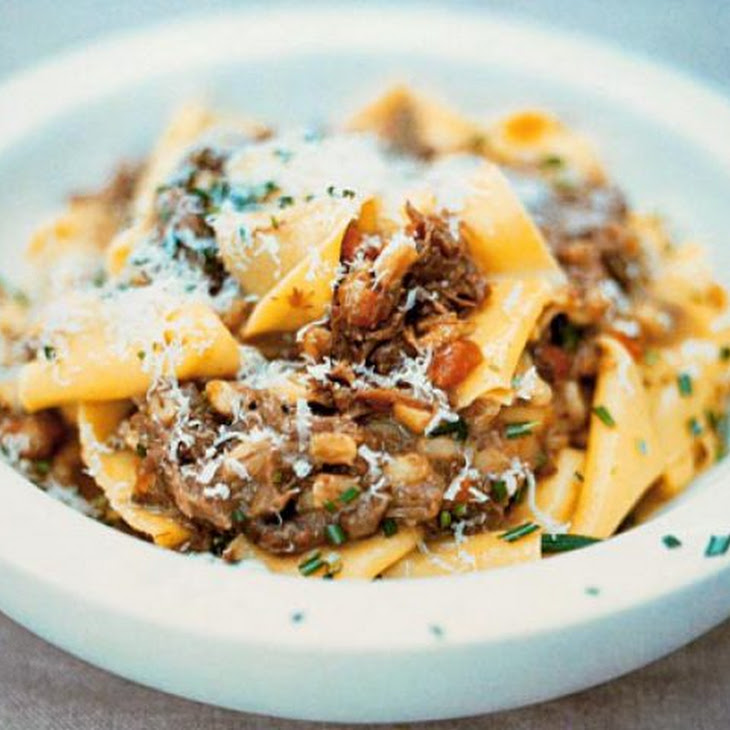
7. Cook pappardelle in boiling salted water for 3 minutes, drain and serve with the slow cooked meat.


SLOW COOKED MEAT
Ingredients
800g casserole chuck steak, chopped into 2cm chunks and seasoned with salt and pepper
30g extra-virgin olive oil
1 handful each of fresh rosemary and fresh thyme and a couple of fresh bay leaves
1 medium red or brown onion, peeled and quartered
4 garlic cloves, peeled
1 medium carrot, peeled and cut into 3cm chunks
1 celery stick, cut into 3cm chunks
100g red wine
400g fresh tomato quartered or canned tomatoes
2 tbs pearl barley, washed and drained
Salt and freshly ground black pepper
100g butter
50g Parmesan cheese

Method
1. Place Parmesan cheese into TM bowl. Grate for 10-15 seconds on speed 9. Set aside in fridge.
2. If you want your herbs chopped then pick the leaves of the rosemary and thyme, place in TM bowl and chop for 3 seconds on speed 7. Set aside. (I like the rustic look of whole herbs so I place them whole into the slow cooker and then remove the stems at the end.)
3. Place onion and garlic in TM bowl. Chop for 3 seconds on speed 5. Scrape down sides of bowl.
4. Add carrot and celery to TM bowl. Chop for 2 seconds on speed 5. Set aside vegetables.
5. Place 15g olive oil in TM bowl and set to Varoma temperature for 4 minutes reverse speed soft. Once the Varoma temperature is reached (approximately 60 seconds in), add half the meat whilst TM is still on.
6. Remove meat, and repeat step 5 for remaining half of meat.
7. Return previously browned meat to TM bowl together with vegetables and any chopped herbs and cook at Varoma temperature for 4 minutes reverse speed soft.
8. Add red wine and cook at Varoma temperature for 2 minutes reverse speed soft.
9. Add tomatoes, pearl barley and whole herbs. Cook for 70 minutes on reverse speed soft at 100C or until meat is tender enough to your liking.
10. Once meat is cooked and tender, season carefully to taste, add butter and the Parmesan that was set aside and mix for 20 seconds on reverse speed soft.
11. Serve over pasta and sprinkle with finely chopped rosemary and additional Parmesan if desired.

Variations: As this is a stew I always look through my veggie crisper in my fridge to see what other veg I can throw in to add more flavour and nutrition. Eg zucchini, capsicum, mushrooms, pumpkin, sweet potato. For the softer vegetables like zucchini, capsicum and mushroom, chop these after the carrot and celery, for 2 seconds on speed 5.

Leftover tip: Use leftover meat as filling for gourmet meat pies.  (I even cook batches purely for the purpose of making meat pies - make the shortcrust pastry from EDC p119, blind bake at 200C for 20 minutes, then add in filling, top with a sheet of puff pastry, brush with egg wash or milk and bake for 45 minutes at 200C or until top is nice and golden).

March 8, 2011

Berry Berry Cake

Cookbook Adventure #5 - "Simply Heaven, Volume 2"

I wanted to use up some home-made cream cheese so I checked out my free cookbook from Philadelphia (think Kraft, not the largest city in Pennsylvania) and found this quick and easy recipe that didn't rely too heavily on the fact that my homemade cream cheese probably had quite different properties to the Philadelphia version.

My cream cheese, was simply made from "hanging" home-made natural yoghurt in the fridge for a couple of hours and letting all the whey drip out.  For more on the science of cheese making see: 
http://hubpages.com/hub/Easy-to-make-Cream-Cheese.

Originally called Cherry Berry Cake, I didn't have any cherries so used extra berries, hence the name!  
Here's a link to a very similar recipe by Philadelphia but which is double in size to the one in the cookbook: http://www.philadelphiacreamcheese.com.au/recipes/Desserts/Cherry-Berry-Cake-with-Marsala-Cream.aspx


And here is my version in Thermotalk:


Ingredients
 
125g butter
125g cream cheese
140g sugar (I used raw sugar)
1 tsp vanilla essence
2 eggs
150g self raising flour
finely grated rind of 1 lemon
2 tbs of milk
160g fresh or frozen blueberries
icing sugar for dusting

Method

Preheat oven to 160C. Line a 22cm x 12cm loaf tin with baking paper.
If you don't have any icing sugar for dusting, then make this first. Place 100g of white sugar into TM bowl and grind for 20 seconds on speed 9. Set aside.
Place sugar into TM bowl. Grind to caster sugar for 3 seconds on speed 9.
Add butter and cream cheese. Mix for 30 seconds on speed 5. Scrape down sides and then mix again for 30 seconds on speed 5 or longer until smooth.
With TM on speed 4 add the eggs one at a time until combined.
Add flour, rind and milk and mix for 10 seconds on speed 3.
Add blueberries and fold gently with the spatula.
Pour mixture into the prepared loaf tin.
Bake in oven for 45-50 minutes or until a skewer inserted into the middle comes out clean.
Allow to cool on a wire rack for 10 minutes before removing from tin. Cool. Dust with icing sugar.

I don't know what it would have tasted like had I used Philadelphia cream cheese, but it sure tasted good and was lovely and moist with my homemade version!


Thrifty tip:
 once you have removed the majority of the cake mix from the TM bowl, spin the blades for 2 seconds on speed 8 and you will find all the mixture flying to the sides which makes it easier to remove and gives you a little bit more cake! Do the same when making dips.

March 6, 2011

Cheese and bacon scrolls


My kids just love bacon. Put bacon in anything and they will eat it. So this recipe caught my eye, and I was even more enticed  when I found out that the dough only used 2 ingredients and I didn't have to hang around waiting for it to prove!

I also wanted to make a more adult version, as believe it or not, I am not a huge bacon fan (the kids get their bacon addiction from their dad!) but I love mediterranean flavours such as sundried tomato, olives and basil.

Here is the website link to the original recipe:

And here it is in Thermotalk:

Ingredients for dough
440g self raising flour
400g greek or natural yoghurt

Ingredients for filling
Approximately 200g grated cheddar or mozzarella or a mix of both (add more or less depending on how cheesey you want it)
Anything you like - think bacon, ham, pepperoni, salami, vegemite, feta, sundried tomatoes, roast capsicum, pickled onions, marinated mushrooms, basil, oregano, parsley etc.

Method
Preheat oven to 180C. Cover a baking tray with baking paper and set aside.
Grate the cheese either by hand or 10-15 seconds on speed 8 in the Thermomix.
Chop the filling ingredients either by hand or use the Thermomix (2-5 seconds on speed 5). 
(If using the Thermomix you don't need to wash it in between processes, unless you don't want to contaminate any particular ingredient with another one. Likewise you don't need to wash it before mixing the dough, as having cheese and other bits in the dough will only make it yummier!).

To make the dough, place flour and yoghurt into TM bowl. 

Mix for 6 seconds on speed 8 to combine. Set dial to closed lid position. Knead the dough for 1 minute on Interval speed. The dough will be a bit sticky. Transfer it to a floured bench/mat. 
Roll dough into a large rectangle. Spread preferred filling all over the dough evenly. Top with grated cheese. Roll from long end to end, encasing all the filling inside.

Cut 2cm segments from the end of the roll and place on baking tray.


 Bake for 20-25 minutes until golden.

Can be eaten warm or cold and are great for lunchboxes and picnics!